The catch: results vary a lot. A screen built with an undersized base or skipped leveling step will wobble, warp, or topple in the first decent windstorm. The structural principles are straightforward, but skipping even one of them causes most of the failures you'll see in DIY forums.
This guide covers the materials you need, exact build steps, the variables that most affect stability, and common mistakes worth avoiding before you make them.
Key Takeaways
- A freestanding screen needs no concrete — but the base must be heavy and wide enough to self-stabilize
- Use pressure-treated lumber for the frame; your panel choice affects privacy level, weight, and wind resistance
- Level the base and square the frame before attaching panels — skip either and the whole structure pays for it
- Wind anchoring is required for all freestanding screens — especially in open yards or elevated spaces
- For commercial or professional settings, pre-built retractable screens offer portable, no-build privacy without the construction
What You Need to Build a Freestanding Privacy Screen
Material selection determines how long the screen holds up. Undersizing lumber or skipping weatherproofing leads to structural failure, not just cosmetic wear.
Lumber and Structural Materials
For a standard 6–7 ft wide × 5–6 ft tall screen, you'll need:
- Vertical frame members: Pressure-treated 2×4s, 6–8 ft lengths (actual size: 1.5 in. × 3.5 in.)
- Horizontal frame members: Pressure-treated 2×4s or 2×6s, 4–6 ft lengths
- Base crosspieces: Pressure-treated 2×6s, 4–6 ft lengths for extending front and back
According to AWC deck construction guidance, lumber in ground contact or near-ground positions must be approved preservative-treated wood rated for ground contact. Ground-contact PT 2×4s run around $4.38 each at Home Depot; 2×6s around $10.48 each.
Fasteners and hardware:
- Exterior-rated hot-dip galvanized or stainless deck screws (2.5–3.5 in. for frame; 3.5 in. for base connections) — Simpson Strong-Tie confirms that standard steel fasteners corrode quickly against ACQ-treated lumber; use ZMAX, HDG, or stainless
- Gate-bracing corner brackets at each frame joint
- Optional: locking caster wheels for a repositionable screen
Panel and Covering Options
| Panel Type | Privacy Level | Airflow | Durability | Notes |
|---|---|---|---|---|
| Composite slats | High | Low | Excellent | 25-year warranty on some products; heaviest option |
| Wood slats (cedar) | High | Low | Good | Natural look, paintable; needs annual sealing |
| Reed/bamboo | Medium | High | Fair | Lightest option (~0.13–0.16 lb/sq ft); 1-year warranty; degrades in wet climates |
| Lattice | Low | High | Good | Best for growing vines; partial privacy only |
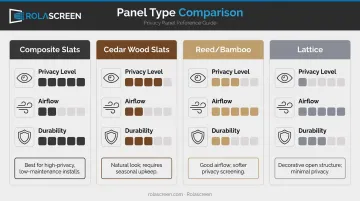
Reed rolls (6 ft × 16 ft) cost around $37–$38 at Home Depot or Lowe's. Composite slats run $5.63–$8.24/sq ft depending on board length.
Tools Required
- Miter saw or circular saw
- Power drill and impact driver
- Staple gun (for reed or fabric panels)
- Tape measure, speed square, level, pencil
- A helper for raising and positioning the frame
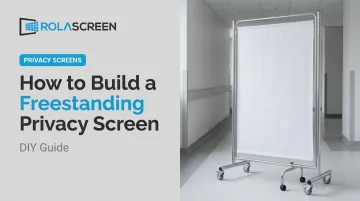
How to Build a Freestanding Privacy Screen: Step-by-Step
These steps apply to the most common wood-frame freestanding style. Adjust dimensions for your space, but don't adjust the structural principles.
Step 1: Plan Your Dimensions and Layout
Most effective outdoor privacy screens are 5–6 ft tall for the panel — that puts the top of the frame at or above average eye level for a seated or standing viewer. Measure your intended placement area and account for furniture clearance.
Decide on your base style:
- Planter box base — adds substantial weight through soil; works on grass, dirt, and pavers
- Flat sled base — crosspieces extend front and back; better on hard, level surfaces where you'll add weight separately
For soft ground (grass or soil), the planter base wins on stability. On a concrete patio, a sled base with weighted planters sitting on the crosspieces is the practical approach.
Step 2: Build the Frame
Cut your lumber to target dimensions, then:
- Assemble the outer rectangle using exterior screws
- Install corner brackets at all four joints — this is the step most DIYers skip, and it's why frames rack under wind load
- Add one or two evenly spaced vertical interior supports across the frame width
- Check for square: measure diagonally corner to corner; both measurements must match before moving on
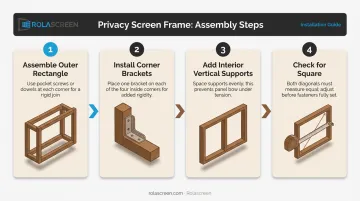
Do not proceed to the base or panels until the frame is confirmed square.
Step 3: Construct and Attach the Base
Cut two base crosspieces and attach them perpendicular to the bottom of the frame, extending roughly 2 feet in front and 2 feet behind. Use at least three screws per connection arranged in a spread pattern — two screws in a straight line can allow rotation at the joint over time.
Base footprint drives stability. The wider and heavier the base, the lower the center of gravity. For a planter-style base, filling the box with topsoil adds significant weight. A 2 ft × 6 ft × 10 in. planter holds roughly 10 cubic feet of soil, which can weigh 300–900 lbs depending on soil type and moisture level, per OSU Extension's soil bulk density data. Even two or three bags of garden soil add useful ballast.
Step 4: Check for Level and Make Adjustments
Stand the frame upright with a helper. Use a level to confirm:
- The frame stands plumb vertically
- The base sits flat on the ground
Uneven ground is the most common cause of a leaning screen. To correct:
- Rake or compact soil beneath the base
- Shim one side with flat rocks or composite shims
- Re-grade the terrain before finalizing position
Do not attach panels before this step. Once panels are on, adjusting level means removing them.
Step 5: Attach the Privacy Panels
- Rigid panels (composite, wood slat): attach with exterior screws to the front face of the frame
- Flexible panels (reed, bamboo, fabric): use a staple gun; pull material taut from top to bottom before securing to prevent sagging
For reed or bamboo, leave 1–2 inches of clearance at the bottom — ground contact wicks moisture and accelerates deterioration.
Panels can sit flush with the face of the frame (modern look) or be inset into the frame recess (framed appearance). Both are structurally sound.
Step 6: Anchor the Base for Wind Resistance
A freestanding screen still needs to be secured against wind, particularly in open yards or elevated patios where gusts channel through with little obstruction.
Two main options:
- Ground staking: Drive a metal landscape stake through the base into the soil and secure it with pipe straps — effective on grass or soft ground
- Dead weight: Place heavy planters, sandbags, or filled decorative pots directly on the base crosspieces
For patios or decks where staking into the surface isn't an option, locking caster wheels (engaged when stationary) or weighted rubber feet provide resistance without drilling into the surface.
Key Variables That Determine Stability and Privacy
Two screens built to the same basic plan can perform very differently. These four variables explain most of the difference.
Height-to-Base Ratio
A tall screen with a short base has a high center of gravity and tips easily. The base footprint should extend at least one-third to one-half of the screen's height in both directions. For a 6 ft screen, that means at least 2 ft of base extension front and back — and more is better.
Panel Weight and Wind Load
Heavier panels (composite, solid wood slat) add stability through mass but act more like a sail in high winds. Lighter panels (reed, lattice) reduce wind load but flutter and loosen fasteners over time. ASCE 7 provisions for freestanding walls treat open panels differently than solid panels — screens with more than 30% open area see reduced wind force. Open/breathable panels perform better in consistently windy climates.
Frame Squareness and Joint Rigidity
A frame that is even slightly out of square will shift and rack under lateral pressure. Corner brackets prevent this. One built slightly off will worsen over time as fasteners loosen.
Ground or Surface Conditions
- Soft soil: allows staking, but may shift seasonally — re-check level each spring
- Hard pavers: requires weighted or wheeled bases; no staking option
- Sloped ground: must be leveled before installation — screens placed on a slope without leveling will lean progressively as the base settles
Surface conditions also determine your weatherproofing approach. The USDA Forest Service confirms that applying a finish to exterior wood minimizes cracking, raised grain, and mildew growth. Composite panels require only soap-and-water cleaning; natural wood and reed need sealant applied at installation and reapplied every 2–3 years.
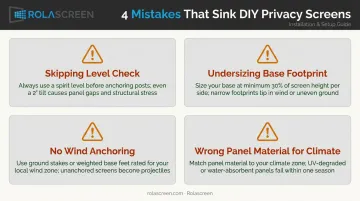
Common Mistakes (and How to Fix Them)
Most freestanding privacy screen failures trace back to four predictable mistakes. Each one is easy to avoid — and fixable if you're already past it.
- Skipping the level check: Attach panels before confirming your base is plumb and you'll spend an afternoon shimming or re-grading what a five-minute check would have caught. Level the base first, every time.
- Undersizing the base footprint: Cutting crosspieces short to save lumber makes the screen top-heavy. Add crosspieces to extend the base, or set heavy planters on the existing footprint as a temporary fix.
- No anchoring in exposed locations: A base that feels solid in your hands can still tip in a gust. Add landscape stakes or sandbag ballast regardless of how stable it seems at ground level.
- Wrong panel material for the climate: Reed and bamboo gray, crack, and develop mildew in wet climates without UV protection. Wood slats without sealant crack in freeze-thaw cycles. Apply exterior sealant to any natural material at installation and re-apply on schedule.
When DIY Isn't the Right Fit: Privacy Screen Alternatives
DIY is not always practical. Rental restrictions, time constraints, commercial regulations, or the need to reposition a screen weekly may make a pre-built solution the better answer.
Pre-Built Freestanding Outdoor Screens
Commercially available options require minimal assembly and are ready in hours rather than a weekend. Common formats include:
- Cedar screens with integrated planters — natural look, moderate weight
- Composite panel units — low maintenance, weather-resistant
- Metal laser-cut screens — decorative, durable, easy to anchor
Brands like Enclo and Trex Privacy offer freestanding designs starting around $170–$300. These cost more than a lumber-based build but save significant time and labor.
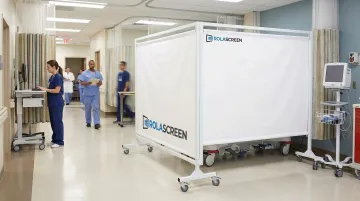
Retractable and Portable Screens for Professional Settings
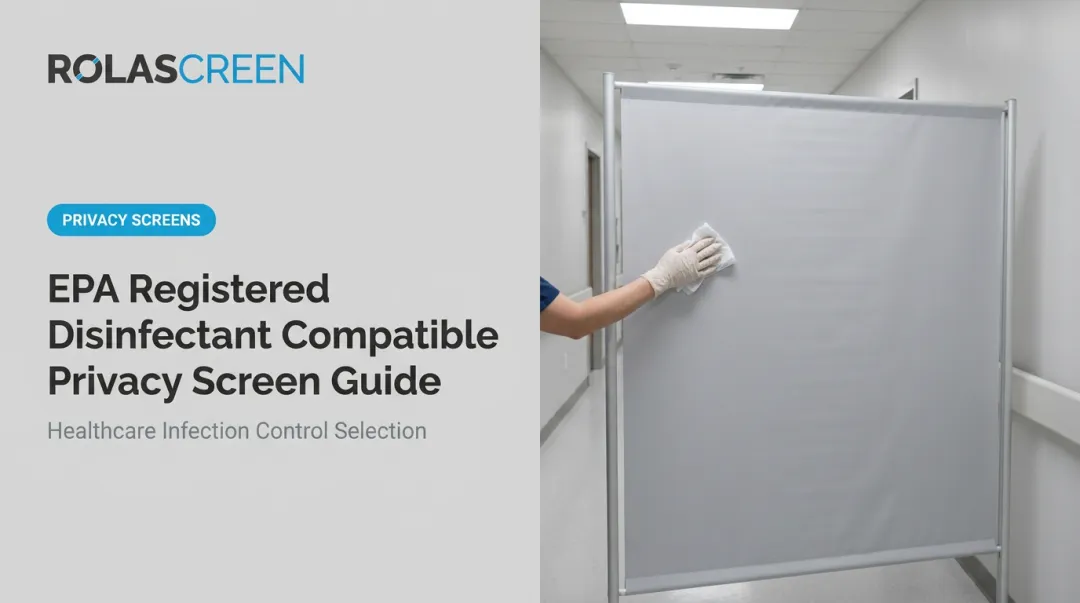
For facilities like clinics, offices, gyms, or commercial spaces that need portable privacy on demand — with no construction, no tools, and no permanent changes — retractable screens are the professional-grade option.
Rolascreen manufactures USA-made portable retractable privacy screens from their Chatsworth, California facility. Their Portable Elite line features medical-grade locking casters, extends to over 10 feet wide, and sets up in minutes without tools or floor anchoring.
Hospitals, VA facilities, and clinics across the country deploy them in emergency departments, infusion centers, and surge capacity spaces — then reposition them as needs shift. That kind of on-demand flexibility has no equivalent in a fixed DIY build.
Living Privacy Screens
Tall container plants — clumping bamboo, ornamental grasses, columnar evergreens in large planters — offer natural privacy that improves over time. The tradeoff is time to fill in: most plants take 1–3 growing seasons to reach functional screening height, so pairing them with a structural screen gives you immediate coverage while they grow.
Conclusion
A freestanding privacy screen is an achievable weekend build when three things go right: the frame is built square, the base is sized correctly, and the screen is anchored against wind. Most failures trace back to shortcuts in exactly these areas.
Choose panel material based on your climate, size the base proportional to screen height, and apply sealant to natural materials at installation. A screen built this way will hold up through seasons with minimal upkeep.
That said, DIY works best for residential patios and backyard spaces. For healthcare facilities, clinics, offices, or any high-traffic commercial environment where cleanliness, compliance, and quick reconfiguration matter, a purpose-built retractable screen is the more practical choice. Rolascreen manufactures portable and wall-mounted privacy screens designed specifically for those settings — medical-grade, wipeable, and ready to deploy without a single tool.
Frequently Asked Questions
How do I keep a freestanding privacy screen from falling over in the wind?
Drive a metal landscape stake through the base into the soil and secure it with pipe straps, or place heavy weighted planters directly on the base crosspieces. On hard surfaces, locking caster wheels provide resistance without ground anchoring. Lighter, open panels like reed or lattice catch less wind than solid composite or wood slat panels.
What is the best material for an outdoor freestanding privacy screen?
Composite panels offer the best durability and lowest maintenance, with some products carrying 25-year warranties. Pressure-treated wood slats give the most natural appearance and are fully paintable or stainable. Reed and bamboo cost the least upfront but carry only a one-year warranty and degrade faster in wet or freeze-thaw climates.
How tall should a freestanding privacy screen be?
5–6 feet is the standard for blocking a seated or standing neighbor's sightline. Going taller requires a proportionally wider base to prevent tipping, and heights above 6 feet often trigger HOA review or local zoning rules — check before you build.
Can I build a freestanding privacy screen on a concrete patio without drilling?
Yes. Use a wide sled base with heavy planters or sandbags placed directly on the crosspieces, or build a wheeled base with locking casters. Neither option requires drilling or anchoring into the concrete surface, provided the base is sufficiently weighted.
How much does it cost to build a DIY freestanding privacy screen?
A basic reed-panel build (6–7 ft wide × 5–6 ft tall) runs roughly $85–$120; the same frame with composite slats runs $220–$400. Budget an extra $15–$30 for bracing hardware and sealant either way.
How do I make a freestanding privacy screen more stable without digging holes?
Two no-dig methods work well: extend the base footprint wider and fill a planter-style base with heavy soil to lower the center of gravity, or drive metal landscape anchor stakes at an angle into the soil and connect them to the base frame with pipe straps or wire ties. Either approach increases tip resistance without permanent ground modification.